Showing posts with label crafts. Show all posts

Add More Pixie Dust to your DisneySide Party with HP and MyPrintly


DisneySide party invitations with HP photo paper

One of the easiest ways to save money when throwing a party is to make some or all of your own decorations.  You can make wall posters, banners, bunting, signs, and so much more, with just some paper, pens, and paint.  If you don't consider yourself the artistic type, then substitute pens and paint for a good printer!  The internet is teeming with great ideas and images to print out.

One of the most useful things that I received in my DisneySide At Home Celebration box was a set photo paper cards from HP.  I used them to print out invitations and thank you cards for the party.  The theme of my DisneySide party was Paintball Mickey (because my son celebrated his 11th birthday with a paintball party), so I found an image of Mickey, an image of a paintball gun (from Disney Infinity), and some images of paint blobs.  I combined them with a photo of the kids in their paintball gear for a cute and memorable thank you card.  I also have a more generic Mickey Paintball invitation and thank you card image at the bottom of this post -- feel free to download and use for your own Mickey Paintball party!
Mickey Paintball party thank you cards

We held the party at our local paintball field.  The place had a picnic area with first-come-first-served picnic tables, so I decided to make a birthday sign to mark our spot.  Artist Simon Phipps generously allowed me to use his adorable Mickey Paintball artwork for the sign.  I added a few more paint splotches and a Happy Birthday sign, then printed out two copies.  I pasted both printouts onto a sheet of stiff cardboard, then attached it to a wooden stick.
Mickey Paintball party birthday sign


I stuck the sign into a glass jar filled with plastic beads in order to make it stand up.  I also added a few smaller Mickey Mouse Clubhouse signs to make the display more festive.  Everyone thought it looked cool, and all our guests had no problem finding our party table!  Thank you so much Simon for letting me use your artwork!  (Please note, the Mickey Paintball artwork belongs to Simon Phipps and cannot be used without his permission!).
Mickey Paintball party birthday sign

Below are the Mickey Paintball invitations and thank you cards that I designed.  They should be printed on 4x6 photo paper.  Feel free to download and print (if you do blog about them, please mention me and link to this post!). To see what other great things you can do with photo paper, go to MyPrintly, HP's new site for printing projects and ideas.  Enjoy!
Mickey Paintball party invitation cards

Mickey Paintball party thank you cards


More DisneySide party posts:


Disclosure:I received photo paper samples from HP, courtesy of Disney and MomSelect.  The views and opinions expressed here are my own.

Pin It
Continue reading...

How to make Paintball Cupcakes with Duff Goldman's Tie-Dye Cake Mix


rainbow cupcakes for a paintball party

When I think of paintball, I think of paint splatters in lots and lots of colors. So for 3Po's paintball birthday party, I decided to make cupcakes decorated to look like paintball splatters.

The easiest way to make a rainbow cake is to use Duff Goldman's Tie-Dye cake mix.  I used the box that I received in my DisneySide At Home Celebration box, and I was really happy with how it turned out.  It tastes great (waaay better than your run-of-the-mill cake mix) and you can't beat the beautiful colors.  In addition to the mix, you'll need 24 gumballs and a batch of white buttercream icing, with about 1/4 of the batch dyed to match the gumball colors.

Duff's Tie-Dye Cake Mix contains dry mix for a 2-layer 8-inch round white sponge cake and a packet of red, blue, and yellow food coloring. The instructions call for 3 egg whites, which was a surprise. All the ones I've used call for 3 whole eggs, but I think the cake turned out much lighter and fluffier because of it.  The idea is simple: divide the prepared cake mix into 6 equal parts, and dye each one a different color.  The instructions specify exactly how many drops of red, yellow, and blue food coloring go into each color (red, yellow, orange, green, blue, and purple).  You could definitely make a tie-dye cake without Duff's mix -- but you will not get Duff's amazing colors.  Trust me. I tried.  I could not replicate Duff's colors with my Wilton food coloring gels.
rainbow cupcakes for a paintball party


You'll be making 24 cupcakes, so line 2 12-cupcake tins. I used red polka dot cupcake liners (because Mickey!), and I was very pleased to see that they did not get washed out after baking.   To get the tie-dye effect, take turns filling the tins with each color, dropping the batter right into the middle of the cupcake bottom, right on top of the previous color.  My fill order was red-orange-yellow-green-blue-violet, and for each color, I used about 1 tablespoon of batter for each cupcake.  Filling the tins took a LOT of time!
rainbow cupcakes for a paintball party


After baking and cooling, it's time to decorate! Frost each cupcake with white buttercream icing, then pipe a paint splatter using colored buttercream icing.  Finally, nestle a gumball in the center of the paint splatter.  Don't they look gorgeous?!
rainbow cupcakes for a paintball party


Everyone is in for a surprise when they bite into the cupcake -- a brightly colored rainbow!  The colors did not get muted or muddied even when baked; they kept their bright colors. Even though the colors are extremely vibrant, they don't affect the taste of the cake. The cake itself is spongy and light and just slightly sweet, so it goes perfectly with the buttercream icing.
rainbow cupcakes for a paintball party


These cupcakes were the highlight of 3Po's Mickey Paintball Party!  I couldn't think of a better way to celebrate his 11th birthday.


More DisneySide party posts:


Disclosure: I received a box of Duff Goldman cake mix as part of my DisneySide At Home Celebration Package, which was provided by Disney via MomSelect. The views and opinions expressed here are my own.

Pin It
Continue reading...

Enter the First Annual Loomy Awards (and an Original Loom Boom giveaway for you!)


Are your kids crazy about loom bracelets?  Mine are, and every day our bracelet collection keeps growing! Loom bracelets are all the rage, and it's not just about bracelets any more.  Every day I see more and more amazing loom bracelet creations -- it's amazing what you can create on a loom bracelet these days!  You can make keychains, charms, phone cases, pencil grips, even gloves and hats!  And oh, the designs: owls, octopi, practically every animal under the sun (including imaginary ones like unicorns, Smurfs and Minions), characters (Disney princesses, Katniss, Miley Cyrus)... objects (cameras, peppers, flowers).... the list goes on and on.

It's about time that somebody came up with prizes for the best loom bracelet creations, and fortunately the Original Loom Boom is stepping up with the very first Annual Loomy Awards!  They are calling on all crafty souls to submit their best loom bracelet creations for the chance to win cash and prizes.  Here are the details:


January has the Golden Globes, February hosts the BAFTAs, and March is home to the Oscars. What better time than awards season to announce the first ever award for loom bracelet fanatics! This April, “loomers” from far and wide will submit their creations for a chance to become a Super Loomer in the 1st Annual Loomy Awards!

The Loomy Awards are sponsored by The Original Loom Boom, a first-of-its kind product intended to organize, display, transport and share your loom bracelet creations. Winners will be chosen from four categories: Best Bracelet, Coolest Charm, Wackiest Wearable, and Best Loom Boom. Three winners will each receive a $250 gift card, and one grand prize winner will receive a $500 gift card! Plus, all winners will receive a special edition of The Original Loom Boom! Entries can be submitted on The Original Loom Boom’s Facebook page beginning on March 30, 2014, and winners will be announced on a live web award show April 30, 2014.

What are you waiting for?  Need some inspiration to get crafting?  How about the chance to win a Loom Boom of your own so you can neatly and easily display your loom bracelet creations?

Win an Original Loom Boom
One lucky Bonggamom Finds reader will receive an Original Loom Boom, a first-of-its-kind product to help you organize, display, transport, and share your loom bracelet creations.

Required Entry
Leave a comment on this post and share the most interesting loom bracelet creation you (or your kids) have made or seen.

Extra Entries
For extra entries, you can do any or all of the following. Please leave a separate comment for each extra entry with a way to verify the entry (i.e. tweet link, blog post link, Facebook id, Twitter id, etc.).

1) Follow bonggamom on Blogger (1 entry)

2) Follow bonggamom on Instagram (1 entry)

3) Follow bonggamom on Pinterest (1 entry)

4) Pin this giveaway on any of your Pinterest boards (1 entry -- you can use the "Pin It" button at the bottom of this page!).

5) "Like Bonggamom Finds" on Facebook and write this on my wall (1 entry):
I entered the Loom Boom giveaway! http://ow.ly/vuKJY 

6) Tweet this once per day (1 entry per day)
Enter to win an Original Loom Boom! Giveaway ends 4/25 @bonggafinds http://ow.ly/vuKJY 

7) Join any open giveaway on Bonggamom Finds (1 entry for every giveaway you join)

The Rules
This giveaway ends at 11:59PM PST on April 25,  2014; I will draw a winner at random, on April 26 and post their name after they confirm acceptance. Continental US residents only. For additional giveaway rules, click here.


Disclosure: I received a Loom Boom as a thank you for posting about the Loomy Awards, as well as a second Loom Boom to give away. Promo information (in italics) is provided by The Original Loom Boom. The views and opinions expressed here are my own.

Pin It
Continue reading...

How to make Valentine's Day canister with Scotch Color and Pattern Duct Tape (and a giveaway for you!)


Scotch Duct Tape Valentines crafts
 I received product samples to review

We just started out on a long break (our school's annual Ski Week/President's Day holiday), and since we've got five whole days, no vacation plans, and a rainy forecast, we'll be doing lots of crafts!  Valentine's Day is coming up, so I've got lots of lovely, flowery crafts on my mind.  You don't need to spend loads on craft materials either -- just grab a couple of rolls of duct tape. There are countless Valentine's Day-themed crafts you can make -- and if you use Scotch Color & Pattern duct tape, the possibilities are even greater. They have a ton of patterns and colors that are perfect for V-Day:  solid pink, solid red, solid black, red lips on black, pink leopard print, rainbow hearts, pink cupcakes, even pink Barbie-themed patterns!  I love them all :)

I received a variety of rolls of Scotch Color & Pattern duct tape to make some Valentine's Day crafts with, so we're all set for our long weekend.  To start with, I made some Valentine's Day canisters in a few different designs to hold Valentine's Day cards, pens, paper clips, or whatever you need to store.  Here's how to make your own:

Duct Tape Valentine's Day canister
You'll need:
  • a can with a resealable lid
  • Scotch Color & Pattern Duct Tape in your favorite Valentine's Day colors and patterns
  • Exacto knife
1) Clean out the inside of the can.

2) Cut strips of duct tape.  Each strip should be long enough to circle the can once.  If you are using light-colored duct tape and your can has lots of designs, each strip should be long enough to circle the can twice.  Use an Exacto knife for the cleanest cut.

3) Wrap a strip of duct tape around the can.  Continue wrapping strips of duct tape around the can until the can is completely covered.

4)  Use an Exacto knife to cut a thin strip out of the middle of the plastic resealable lid.

Scotch Duct Tape Valentines crafts


You can turn your can into storage container for your child's Valentines cards!  Or, you can turn it into a coin bank -- just cut a shorter slit in the lid.
Scotch Duct Tape Valentines crafts


Finally, you can do away with the lid altogether and turn your can into a pretty storage for all your child's pens and pencils!
Scotch Duct Tape Valentines crafts

Speaking of pens and pencils, did you notice the pretty flower pen in the photo above?  I made it using Scotch Color & Pattern Duct Tape!  I followed a great step-by-step tutorial for duct tape rose pens on Instructables; you can find similar instructions (for a rosette hairpiece) on the Scotch Duct Tape project site.
Scotch Duct Tape Valentines crafts


Here's a list of more great Valentine's-themed projects you can create with Scotch Duct Tape.  Don't forget to use pink, red, and Valentine's-themed patterns for an extra-romantic touch!

Duct Tape envelopes -- to put Valentine's Day cards in!
Paisely Power Flower -- make a bunch of these along with the duct tape rose, and present a unique bouquet to your sweetheart!
Rosette Ring -- wear this on your special date!
Pop Art frames -- for that special Valentine's Day photo!


Win a Scotch Duct Tape prize pack
One lucky Bonggamom Finds reader will receive an assortment of Scotch Colors & Patterns duct tape

Required Entry
Leave a comment on this post and tell me your favorite duct tape crafts.

Extra Entries
For extra entries, you can do any or all of the following. Please leave a separate comment for each extra entry with a way to verify the entry (i.e. tweet link, blog post link, Facebook id, Twitter id, etc.).

1) Follow bonggamom on Blogger (1 entry)

2) Follow bonggamom on Instagram (1 entry)

3) Follow bonggamom on Pinterest (1 entry)

4) Pin this giveaway on any of your Pinterest boards (1 entry -- you can use the "Pin It" button at the bottom of this page!).

5) "Like" Bonggamom Finds on Facebook and write this on my wall (1 entry):
I entered the Scotch Color & Pattern duct tape giveaway! http://ow.ly/tzn5J 

6) Tweet this (1 entry per day)
Enter to win an assortment of Scotch Color & Pattern duct tape! Giveaway ends  2/28/14 on @bonggafinds: http://ow.ly/tzn5J 

7) Join any open giveaway on Bonggamom Finds (1 entry per giveaway you've joined)

The Rules
This giveaway ends at 11:59PM PST on Feb 28 2014; I will draw a winner at random on March 1 and post their name after they confirm acceptance. Continental US residents only. For additional giveaway rules, click here.


Disclosure: I received samples from Scotch to facilitate this post. The views and opinions expressed here are my own.

Pin It
Continue reading...

Father's Day Gift Idea: Skylanders Giants


If the dad in your live loves to play videogames, the Skylanders Giants set is a fun way to celebrate Father's Day!  Skylanders Giants is the sequel videogame to the popular Skylanders.  What makes these  games unique is how they merge physical toys with the video game world.  When you place a Skylanders action figure on the "Portal of Power", it creates a virtual version of the character in your Skylanders game!  How cool is that!  Players can use those characters to work their way through the game.  There are tons of figures to collect, and you can even use the action figures from the original Skylanders game in Skylanders giants, so this is a game that grows with  your family.  Dad is going to love it!

This Father’s Day, combine two things dad loves- spending time with his kids and gaming! The most popular game that dads play with their kids, Skylanders Giants, offers a starter pack for only $69.99 (available on any console). Now dad can spend quality family time by helping the kids bring toys to life in the world of Skylands!


Already a fan? Surprise dad with a special handmade Skylanders frame and include one of your favorite memories of playing the game with dad! The quick and simple character frame gift idea can be made in 5 easy steps- instructions below.


You can download the instructions by right-clicking on the image with your mouse and selecting the "Save As..." option.  Happy Father's Day!


Disclosure: I did not receive a sample or monetary compensation for this post. The views and opinions expressed here are my own.

Pin It
Continue reading...

Treat your daughter (and yourself) to a Dragonfly Designs jewelry party


When it comes to birthday parties, I'm usually an all-or-nothing kind of party planner. When I outsource the birthday party, the party place (mini golf, laser tag, trampoline park, wherever it may be) does it all; all I provide is the birthday cake and party favors.   When I host it at home, I do everything -- the food, crafts, favors and activities.  I consider myself pretty good with simple crafts -- but I never realized how much difference hiring a professional to oversee the party activities would make to a home birthday party, until Dragonfly Designs hosted a jewelry making party for The Pea's 12th birthday.  Owner Stacee and her assistant will come to your home, bring all the materials your guests need to create beautiful custom jewelry, do all the setup, supervise the whole activity, and clean up afterwards.  Stacee has been hosting these parties since 2005, and she has been creating jewelry all her life, so she's the perfect person to help your daughter and her guests create amazing works of art.  Keep reading below and see for yourself!


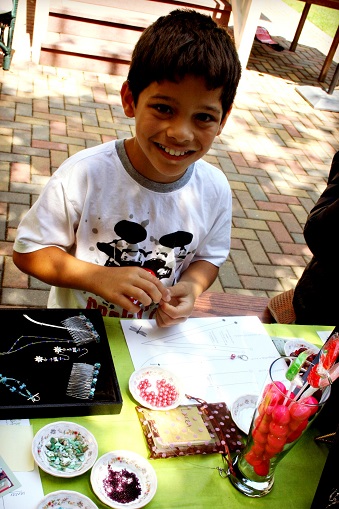
To start things off, each guest made a simple beaded bracelet.  A table was laid out with a variety of beads in every shape and color, charms, metal spacers, feathers, and other trinkets.  Each girl was given a stack of little bowls and told to help themselves to whatever they wanted to use for their bracelet.


Check out the amazing variety of beads, charms and spacers we had to choose from!  It's kind of like Ali Baba's Treasure Cave of Beads.  That's one huge advantage a Dragonfly Designs party has over doing it all by yourself.  It would cost a small fortune to assemble the quantity, quality and variety of beads to match this collection -- and you'd have a LOT of beads left over after the party was done.


Stacee and her assistants helped the girls every step of the way.  They gave each guest a length of stringing wire with a clasp already attached to one end.  They gave advice on selecting beads of complimentary shape, size and color.  They taught more complicated beading techniques for the girls who wanted more than just a single-string bead bracelet.  They provided idea boards filled with finished projects to inspire the girls and see just what kinds of creations were possible.


Each guest even received a laminated instruction card to help them figure out how long their bracelets should be.  


Once each guest had finished stringing the beads for their bracelet, they gave their project to Stacee or her assistant, who finished the bracelet off by adding the other half of the clasp and crimping the ends.  That way, each bracelet (and subsequent piece of jewelry) came out perfectly, with no random bits of wire sticking out.  


(Check out 3Po enjoying himself immensely.  The boys were a bit shy at first, declaring the whole thing to be "too girly", but when Stacee said that they could make keychains, and when I reminded them that Mother's Day was coming up, they decided to join in.  The funny thing was that both boys ended up making bracelets for themselves!)

Once their first bracelet was done, Stacee let them make more beaded jewelry.  They could choose to make a necklace, earrings, hair comb, bookmark, keychain, zipper pull, you name it.  The girls (along with 3Po and Jammy) really went to town, putting all their imagination and creativity to work.  Everyone was absorbed in the process, and the 2 hours really flew by.  As one girl told me, "I could do this all day!".


The end results were AMAZING.  The girls made hair clips, earrings, necklaces, hair combs and bracelets.  I loved the fact that each and every creation was unique. Everyone used different beads, some girls added charms, some added feathers.  Because Stacy started and finished each piece, each piece looked really professional.  Again, that's something I could never do on my own!


Each guest was given a beautiful organza pouch to store their creations.


I can't stress enough how EASY the whole thing was.  Stacee and her assistant literally did EVERYTHING. They worked nonstop for those 2 hours, starting off jewelry pieces, finishing off jewelry pieces, wiring up special beads to make charms or accent pieces, returning unused beads to their containers, giving advice, answering questions... like I said, nonstop.  And by handing over the activity portion of the party, I was able to see to all the other details of the party: food, drinks, greeting latecomer guests, showing guests where the restroom was, all the other things that make a party run smoothly.... without having to disturb the activity flow!  I was able to walk around, admire everyone's work, and actually enjoy the party.

Ha... you didn't think I'd actually be able to resist trying my hand at jewelry making myself, did you?  As soon as I saw that table full of awesome beads, I found myself itching to making something.  I made a double strand necklace, and Stacee used a wire-wrapping technique to transform a large metallic bead into a charm.  It was beautiful, and I can't wait to wear it!


Needless to say, Bay Area peeps, I highly recommend Dragonfly Designs for your daughter's birthday party.  Or yours (see photo above.. yes, grownups love making jewelry too!).  Or for your best friend's baby shower.  Or bridal shower.  Or for that school auction party you were thinking of hosting.   I could go on and on about their summer camps and classes, but that's the subject of another post.  Or two.  Stay tuned.


One of The Pea's friends pretty much summed up the whole experience when she said:
Best. Party. Ever.


Go check out Dragonfly Designs!


Disclosure: Dragonfly Designs hosted a complimentary party for my daughter. The views and opinions expressed here are my own.


Pin It
Continue reading...

American Girl Magazine Special Birthday Coloring Page


American Girl Magazine turns 20 this year, and their latest issue is all about celebrations and parties!  Their Jan/Feb 2013 kicks off a yearlong celebration with lots of tips and tricks for throwing the best party ever.  You'll find ideas for party snacks, favors, games and activities, along with true birthday tales from American Girl readers.

Best of all, the birthday issue has a special birthday-themed pull-out coloring page!  I've said it before and I'll say it again, coloring pages are one of the best activities to keep guests occupied -- early arrivals can color while waiting for everyone else, stragglers at the end of the party can color while waiting for their parents, and everyone can color between party games!  I've scanned the pull-out so that anyone planning an American Girl-themed party can make copies for all their guests to enjoy:


These three pages are actually one long panoramic coloring sheet, so you can print each one individually and connect them, or print the full image below:


Click on each image to access the full-sized image, then right-click and select "Save As..." to download the image to your computer.

If you prefer your documents in Adobe PDF format, here is a link to the same coloring pages on my Scribd account.  To download, just click on the link or on the Download icon (with the downward-facing arrow)


You can subscribe to American Girl Magazine online, or if you just want the birthday issue, you can purchase the American Girl Magazine birthday issue individually at AmericanGirl.com.

For more American Girl party activities, check out the American Girl Magazine archives.  They have some great ideas from past issues for girls to download or enjoy online.

Need more American Girl coloring fun?   Here are links to more of my American Girl coloring pages. Have fun!
Coconut and Licorice
American Girl Fashions
Rebecca Paper Dolls


Disclosure: I received a sample issue of American Girl Magazine to facilitate my review, but have not been paid to review the product or give my opinions.  The views and opinions expressed here are my own.

Pin It
Continue reading...

Manischewitz Chanukah House


Families who celebrate Chanukah now have another reason to celebrate: Manischewitz's Chanukah House decorating kit!  It contains everything you need to assemble and decorate a Chanukah-themed house -- vanilla cookie panels, frosting and candy decorations.  What a great alternative to the regular red-and-green gingerbread house, especially for Jewish families who want a fun edible craft activity to celebrate their special holiday.

Here's more information about the Chanukah House:

The Manischewitz® Chanukah House Decorating Kit consists of a Vanilla cookie base for assembling your creation and an assortment of toppings and additions to outfit the house as your imagination envisions it! The toppings include blue, white, and yellow icing, sprinkles, mini beads, fondant, sugar, and custom sugar decorative pieces of a Star of David and a Menorah, both which are exclusive to Manischewitz®. SRP for the Chanukah House Decorating Kit is $14.99.


Raising my children to be global citizens with an appreciation for different cultures is very important to me, so I welcomed the chance to review a Manischewitz® Chanukah House Decorating Kit.  After a fun afternoon, we all agreed that assembling and decorating the Chanukah House could not have been  easier or more fun.


The kids had a blast putting this house together..  I suggested they decorate each panel (4 sides and 2 roof pieces) before assembling the house, and I think this made all the difference.  They were able to put much more detail on each piece, and they really went to town on the decorations.


Some things I loved about this kit:
1) There were 3 icing colors: dark blue, light blue, and white -- so the kids could come up with fancier designs.

2)  As long as the icing was kept sealed, it didn't dry up, so the kids didn't have to hurry.  They were busy for hours!

3)  The rolled fondant made it easy to achieve a neat finish.

4)  We like sugar cookies way better than gingerbread, so we are going to enjoy nibbling at our Chanukah House far more than a regular gingerbread house!

Just one thing to note: many of the pieces came out of the box already broken.  This is not unusual even with gingerbread house kits, and all you have to do is mend the broken pieces with icing, but the sugar cookie walls and roof did seem unusually prone to break.  Perhaps it's because sugar cookies are more brittle than gingerbread?  Whatever the case, handle with care!

Each child got to decorate 2 sides (The Pea did the front and back, while 3Po and Jammy each did a side and a roof piece), and each child chose to decorate it in his or her own way.  Each side came out looking unique and special.


I have to say, this is, hands down, the best looking candy house we've EVER decorated.  I swear, I did not help them!  Okay, I did do the white squiggly icing on the chimney and on the cookie base, and I did help cut a few of the fondant roof tiles, but only because I begged them to let me do it; I was dying to join in the fun.

Our activity also sparked a lot of discussion about the history of Chanukah and traditional symbols like the Star of David, the Menorah and the symbols on the dreidel.  It turned out to be a great way to learn about another culture!


Join the Chanukah House Decorating Contest for a chance to win $500
Bring out your inner architect and design a Chanukah House for a chance to win some great prizes. From November 12, 2012 to December 15, 2012, upload a photo of a hand built Chanukah House using the new Manischewitz® Chanukah House Decorating Kit. The Chanukah House Decorating Kit includes everything you need to build a creative and tasty house!

It’s easy to enter! Simply upload a photo of your Chanukah House to the Manischewitz® Facebook website (www.facebook.com/Manischewitz.) There is a limit of one online entry per person. Additional materials such as sprinkles, extra frosting, cookies, candy, etcetera, can be used to enhance your design; the only limit is your imagination! Following the close of the contest, a panel of judges will determine One Grand Prize Winner and One Second Prize Winner. The judges will also select five finalists whose entries will be posted online for voting by the public; the entry with the most “likes” on Facebook will be named the Third Prize Winner.

The Grand Prize Winner will receive $500, Second Prize $200, and Third Prize receives $150 worth of Manischewitz® products. Additionally, there will be One Fourth Prize “Lucky Voting Participant” Winner, selected at random from a list of those who participate in the Facebook online voting, who will receive $100 in assorted Manischewitz® products. You must be 18 years of age or older to enter the contest, however, minors under the age of 18 can submit their entry with parental permission, using a parent or guardian’s e-mail address. For a complete list of rules, click here.


Disclosure: I received a Chanukah House Kit from Manischewitz to review.. Product information and contest description (in italics) are provided by Manischewitz. The views and opinions expressed here are my own.

Pin It
Continue reading...

Search This Blog

Bongga Posts

Bongga Tweets

I'm Going!

Blog Archive


Bonggamom Finds Copyright © 2009 Cosmetic Girl Designed by Ipietoon | In Collaboration with FIFA
Girl Illustration Copyrighted to Dapino Colada