Showing posts with label recipes. Show all posts

Spread on the flavor with Mezzetta Everything Spread


Garlic bread is easy to make -- but any recipe that calls for minced garlic can be a real pain. Peeling and mincing garlic is not one of my favorite tasks (not to mention cleaning my hands and utensils afterwards), so I often rely on pre-minced garlic.  Now, Mezzetta Foods, best known for their jarred olives and pickled peppers and specialty Italian jarred foods, has come up with something even better: a Savory Garlic Spread!

It's all part of their new Everything Spreads line, which features savory ingredients blended into a ready-to-use spread.  These spreads are great to add to your favorite recipes (or just a slice of bread!) to give it a burst of flavor.  There are four varieties:  Sun-Dried Tomato & Basil, Red Hot Chili Pepper, Olive Parmesan & Garlic, and Savory Garlic.  We received samples of Mezzetta Everything Spreads and we can't wait to try them all!

First up: the Savory Garlic spread.  We used it to make the easiest, most delicious garlic bread ever!  Just spread butter on a baguette, then spread some Savory Garlic on top, then broil. Served it with a caprese salad, it makes a wonderful meal.


The taste explosion doesn't end with garlic bread.  Mezetta's website, www.mezzetta.com, has lots of recipes and ideas for using Everything Spreads.  Here are 5 suggestions they have for using Mezzetta Savory Garlic Everything Spread:

• Make ballpark garlic fries.
• Add to mashed potatoes.
• Toss with pasta.
• Spoon over garden vegetables.
• Make garlic butter for steak.

Savory Garlic is such a versatile spread, I had no problem coming up with 5 suggestions of my own!

• Add to hummus.
• Use to make garlic fried rice.
• Brush onto grilled and buttered corn.
• Brush onto grilled chicken.
• Brush on top of homemade bread rolls or biscuits before baking.

Basically, you can use the Savory Garlic spread on everything you would use minced garlic -- without all the fuss of mincing your own garlic.  Imagine the possibilities when you have all four flavors in your pantry!


You can find Mezzetta Everything Spread at West Coast Safeway stores, Kroger and Raley's stores, and H.E.B. in Texas for about $3.49.  Happy cooking (and eating!)!


Disclosure:I received product samples for review.  The views and opinions expressed here are my own.

Pin It
Continue reading...

How to make Paintball Cupcakes with Duff Goldman's Tie-Dye Cake Mix


rainbow cupcakes for a paintball party

When I think of paintball, I think of paint splatters in lots and lots of colors. So for 3Po's paintball birthday party, I decided to make cupcakes decorated to look like paintball splatters.

The easiest way to make a rainbow cake is to use Duff Goldman's Tie-Dye cake mix.  I used the box that I received in my DisneySide At Home Celebration box, and I was really happy with how it turned out.  It tastes great (waaay better than your run-of-the-mill cake mix) and you can't beat the beautiful colors.  In addition to the mix, you'll need 24 gumballs and a batch of white buttercream icing, with about 1/4 of the batch dyed to match the gumball colors.

Duff's Tie-Dye Cake Mix contains dry mix for a 2-layer 8-inch round white sponge cake and a packet of red, blue, and yellow food coloring. The instructions call for 3 egg whites, which was a surprise. All the ones I've used call for 3 whole eggs, but I think the cake turned out much lighter and fluffier because of it.  The idea is simple: divide the prepared cake mix into 6 equal parts, and dye each one a different color.  The instructions specify exactly how many drops of red, yellow, and blue food coloring go into each color (red, yellow, orange, green, blue, and purple).  You could definitely make a tie-dye cake without Duff's mix -- but you will not get Duff's amazing colors.  Trust me. I tried.  I could not replicate Duff's colors with my Wilton food coloring gels.
rainbow cupcakes for a paintball party


You'll be making 24 cupcakes, so line 2 12-cupcake tins. I used red polka dot cupcake liners (because Mickey!), and I was very pleased to see that they did not get washed out after baking.   To get the tie-dye effect, take turns filling the tins with each color, dropping the batter right into the middle of the cupcake bottom, right on top of the previous color.  My fill order was red-orange-yellow-green-blue-violet, and for each color, I used about 1 tablespoon of batter for each cupcake.  Filling the tins took a LOT of time!
rainbow cupcakes for a paintball party


After baking and cooling, it's time to decorate! Frost each cupcake with white buttercream icing, then pipe a paint splatter using colored buttercream icing.  Finally, nestle a gumball in the center of the paint splatter.  Don't they look gorgeous?!
rainbow cupcakes for a paintball party


Everyone is in for a surprise when they bite into the cupcake -- a brightly colored rainbow!  The colors did not get muted or muddied even when baked; they kept their bright colors. Even though the colors are extremely vibrant, they don't affect the taste of the cake. The cake itself is spongy and light and just slightly sweet, so it goes perfectly with the buttercream icing.
rainbow cupcakes for a paintball party


These cupcakes were the highlight of 3Po's Mickey Paintball Party!  I couldn't think of a better way to celebrate his 11th birthday.


More DisneySide party posts:


Disclosure: I received a box of Duff Goldman cake mix as part of my DisneySide At Home Celebration Package, which was provided by Disney via MomSelect. The views and opinions expressed here are my own.

Pin It
Continue reading...

Fake Out Your Thanksgiving with CravOn


CravOn fries

With Thanksgiving just around the corner, it’s time to start thinking about what to prepare for your family. Don’t you wish there was a way to cut the time in the kitchen so that you could spend more time with your loved ones?  CravOn wants to help you out this year with recipes that taste just like your traditional ones, but are better-for-you and require half the prep time. Using CravOn as a substitute in your dishes cuts out the time you’ll spend peeling and cutting potatoes, leaving you more time to enjoy a cocktail and relax. And because they are a healthier alternative to other frozen potatoes, you’ll have less guilt (and can help yourself to another spoonful – we won’t judge!). Celebrity Chef Nikki Shaw has come up with her very own spins on Thanksgiving favorites to cut out half the fat, yet none of the goodness -- check out her recipes on the CravOn Fries website!

CravOn invited me to put my own spin on holiday food, I took inspiration from Chef Nikki's Fully Loaded Baked Potato Fries and came up with an easy appetizer dish that's so delicious, my family had it for dinner last night!  Everyone loves starting holiday parties and nachos (especially when your family is watching a football game on Thanksgiving day!), so I made a nacho dish using CravOn fries instead of tortilla chips!  You don't have to cut or fry the potatoes, and you don't even have to defrost or pre-baked them -- basically all you do is layer them in a casserole with a bunch of nacho toppings like beans, sour cream, tomatillo sauce and cheese!


If your mouth is watering, check out my recipe below and try it out for your next family gathering:

French Fry Nacho Casserole

French Fry Nacho Casserole


1 32-oz. package CravOn Steak Cut Fries
1 tablespoon onion salt
1 tablespoon garlic salt
1 tablespoon paprika
2 cans (10 oz. each) refried beans
1 can (10 oz.) diced tomatoes (you can use the fire roasted variety if you want more kick)
3 cups sharp cheddar cheese, shredded
1 tub (8 oz.) light sour cream
1 can (4 oz.) green tomatillo sauce
1 large avocado
1/4 cup cilantro

Preheat oven to 400 degrees Fahrenheit.

Toss the fries in a bowl with the onion salt, garlic salt, and paprika.

Spread the refried beans onto the bottom of a 3 or 4 quart casserole dish.

Spread the diced tomatoes on top of the refried beans.

Spread about half of the cheese on top of the tomatoes

Spread the fries on top of the cheese.

Spread the sour cream on top of the fries.

Pour the tomatillo sauce on top of the sour cream.

Sprinkle the remaining cheese and some of the cilantro on top.

Bake the casserole in the oven for 40 minutes.

Top with diced avocadoes and cilantro, and serve immediately.


Now that you've got your appetizer dish all set, check out CravOn's Thanksgiving Pinterest board for ideas and inspiration -- you could even win a $250 gift card from CravOn!

Pin to Win with CravOn


CravOn is hosting a contest on Pinterest this holiday season – and one lucky winner will get a $250 gift card to spend on groceries for the holidays! All you have to do is log on to Pinterest and pin your favorite holiday recipes using inspiration from CravOn's Thanksgiving Cravings board with the hashtag #CravOnThanksgivingFakeOut in your pin description. Then email CravOn (cravoncontest@fahlgren.com) a link to your pin as an entry!


Disclosure: I received coupons to purchase CravOn fries and a gift card to purchase the remaining ingredients. The views and opinions expressed here are my own.

Pin It
Continue reading...

Taste the flavors of fall with Duncan Hines


Much as I've enjoyed the summer, I have to admit the heat is wearing me down, and I'm excited about fall.  I'm looking forward to the cool, crisp, fall weather. I'm looking forward to jumping back into my new school job and seeing my friends from school. I'm looking forward to seeing those distinctive fall colors -- orange, yellow, russet, gold, caramel, red, and brown -- and tastes.  Caramel, cinnamon, apple, squash, pumpkin... yum!

To celebrate the flavors of fall, Duncan Hines is introducing two new delicious and easy products with on trend flavors and colors: Duncan Hines® Limited Edition Autumn Velvets cake mix and Caramel Apple Decadent cupcake mix. Duncan Hines aims to make holiday baking easier, so that bakers can share the most wonderful time and treats of the year with those who matter most, without the stress and hassle.   Duncan Hines® sent us samples of their new mixes, which are always a standout at our home because I'm way too busy to bake, and The Pea loves to decorate and frost more than she likes to bake from scratch -- and everyone loves to eat!

The new Duncan Hines Limited Edition Decadent Caramel Apple Cupcake mix (MSRP $3.29) includes everything you need to make a batch of yummy cupackes: apple cake mix, caramel frosting mix, and a pastry bag to fill and frost.  

Many times, following cake or cupcake mix directions straight out of the box results in a bland, boring finished product, but The Pea and her friends followed the basic recipe and ended up with a delicious, great-tasting cupcake!  The apple cake was so moist and tasty, and it went perfectly with the caramel frosting.  Personally I thought the frosting was a bit too sweet, but The Pea and her friends loved it so much, they devoured the whole batch in record time.


The Duncan Hines® Limited Edition Autumn Velvets cake mix is part of their new line of velvet cakes.  Like the Blue Velvet, Pink Velvet, and Spring Velvet cake mixes I reviewed earlier this year, the Autumn Velvet goes beyond the traditional velvet!  You get 2 mixes in each box: an orange velvet and a brown velvet. Neither tastes like a red velvet, but neither tastes like their color namesakes (orange or chocolate) either -- it's that light, fluffy texture that makes it similar to a red velvet cake. The colors are so pretty, just perfect for making a fall layer cake for football tailgates, Halloween parties, or Thanksgiving dinner.

The mix tastes great just as it is, but we decided to get creative and make some biscotti.  We added pumpkin pie spice to both the orange and brown mixes, and we drizzled melted orange and white candy melts over the top to make it look pretty.  They tasted as great as they looked!

Autumn Spice Biscotti

(recipe courtesy of Duncan Hines)

Hands-On Tie: 20 Minutes
Total Time: 60 Minutes
Servings: 30 Biscotti

Ingredients:
1 package Duncan Hines Autumn Velvets Cake Mix
4 large eggs, divided
8 Tbsp. (1 stick) butter, softened and divided
½ cup all-purpose flour, divided
4 tsp. vanilla extract, divided
1 Tbsp. pumpkin pie spice, divided*
1 cup toasted chopped pecans, walnuts or almonds, divided**
1 container Duncan Hines Creamy Vanilla or Chocolate Icing, melted (optional)**

Baking Instructions:
1. Preheat oven to 350°F. Line a baking pan with parchment paper.
2. Combine Orange Velvet Cake mix with 2 eggs, 4 Tbsp. butter, ¼ cup flour, 2 tsp. vanilla extract and 1-1/2 tsp. pumpkin pie spice in a large bowl. Beat at low speed with electric mixer 30 seconds or until just moistened, scraping sides of bowl with rubber spatula. Continue beating at medium speed 2 minutes. Stir in ½ cup nuts. Dough will be thick. Repeat in separate large bowl with Brown Velvet Cake Mix.
3. Arrange each dough onto baking pan and with floured hands, pat each into 12”x4” logs.

4. Bake 40 minutes. Let cool slightly. Slice each log into ½-inch diagonal slices. Arrange slices on baking pan and bake an additional 20 minutes. Transfer to wire rack and cool completely.
5. Melt frosting in a microwave safe bowl on high for 20 seconds or until just melted. Drizzle on biscotti.

Notes:
* As a variation, use 2-teaspoon ground cinnamon and ¼ teaspoon allspice.
** We did not use any nuts!
*** Instead of melted frosting, we drizzled melted candy melts (with a bit of vegetable oil mixed it, to make it runny) on top of our biscotti.

Disclosure: I received a product sample to facilitate my review. The views and opinions expressed here are my own.

Pin It
Continue reading...

Pink Posts: Sparkling ICE Pink Grapefruit


From October 1-31st Sparkling ICE donates 1¢ per bottle of its Pink Grapefruit Sparkling ICE to help find a cure for Breast Cancer.  Proceeds go directly back to the community where the product was sold: Sparkling ICE will work closely with each community and allow them to select the charity right in their region that they would most like to offer the donations to (i.e. Susan G. Komen Affiliates, Local/Regional Breast Cancer Research Foundations, etc.).

Need something to do with all that Grapefruit Sparkling ICE you're planning to buy?  Sparkling ICE has created a specialty “Sip Pink for the Cure” Cocktail using its Pink Grapefruit Sparkling ICE flavor!


Sparkling ICE Sip Pink for the Cure Cocktail

Ingredients
3 oz. Grapefruit Sparkling ICE
1 ½ oz. vodka
1 oz. lime juice
Lime wedge
Sliced fresh jalapeƱo
Chili salt for rim of glass (Kosher salt mixed with chili powder)

Directions
Use a lime wedge to rub the entire rim of a chilled martini glass, and dip into chili salt mixture.
Combine vodka and jalapeno slices with ice in a shaker.
Strain and pour into the chilled martini glass.
Top with Grapefruit Sparkling ICE.
Garnish with a few Jalapeno slices.


Disclosure: I did not receive a sample or monetary compensation for this post. The views and opinions expressed here are my own.

Pin It
Continue reading...

Celebrate Pets with American Girl Magazine


American Girl Magazine is celebrating furry, fluffy, feathered, finned, four-legged friends -- basically any kind of animal that girls love -- with their We  Animals issue for March and April.  It couldn't have come at a better time, since April is Prevention of Cruelty to Animals Month.  In addition, March 23 is National Puppy Day and April 26 is National Kids and Pets Day!  Here's a sneak peek at what's inside:

* A true story about how 12 year old Brooke and her wild mustang, Jacuzzi
* 13 horse posters
* Tips for taking great pet photos
* How to make a menagerie of sea creatures out of clay (The Pea really wants to try this!)
* Cute photos of readers' pets
* Fun quizzes: what animal best represents your personality and style?
* Decorating ideas for animal cupcakes
* Recipes for animal-themed dishes like Animal Crackers, Monkey Bread Muffins, Pigs in a Blanket, Birdseed Bars and more.

Today we treated ourselves to the Grasshopper Shake.  It's cold and minty and oh-so-good, and the green color makes it perfect for St. Patrick's Day!  I've copied out the recipe for everyone to enjoy:


Grasshopper Shake
1/2 cup milk
1 1/2 cups mint chocolate-chip ice cream
2 crushed chocolate-sandwich cookies (we used 3 Girl Scout Thin Mint cookies for extra minty-ness!)
chocolate syrup
whipped cream

Put milk and ice cream in a blender.  Ask an adult to blend until smooth.  Remove the pitcher from the blender, then stir in 2 crushed chocolate-sandwich cookies.  Before serving the shake, drizzle some chocolate syrup down the inside of a glass.  Pour the shake into the glass and top with whipped cream.  Serves 1-2.

Next up on our must-try list:  Frozen Purple Cow shake (made with vanilla ice cream and grape juice) and fun variations on the traditional Ants-on-a-log.  If your American Girl is an animal lover, this issue is a must!  You can buy the single issue online , or subscribe for the entire year.


Disclosure: I received a sample copy from American Girl Magazine for review.  The views and opinions expressed here are my own.

Pin It
Continue reading...

Giveaway: Cooking with Hidden Valley Ranch {Giveaway}


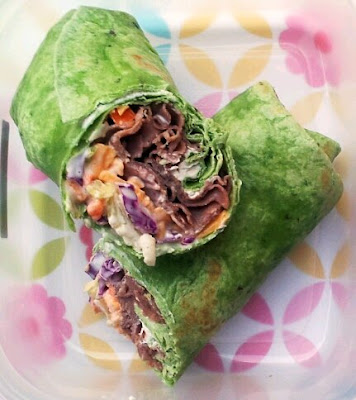
When people think of pantry staples, they usually think of bread, pasta, ketchup, flour, sugar, coffee, spices, peanut butter, mayo.    Here's one more item your pantry should never be without:  Hidden Valley Ranch Dressing.  I always have a bottle on hand!  Everyone in our family loves it, and not just as a salad dressing.  We dip everything into it:  french fries, veggies, breadsticks, chicken nuggets, fish sticks, even pizza crusts!  We top chili with it, we spread it on sandwiches instead of mayo, we pour it on baked potatoes.  There's just something about that tangy creaminess that's irresistible!  Why, just this morning I used Hidden Valley Ranch Dressing to add some zing to my kids' lunch wraps:


Roast Beef Ranch Wrap
1 large spinach tortilla
1/4 cup American salad mix (iceberg lettuce, red cabbage, carrots)
2 Tablespoons Hidden Valley® Original Ranch® Dressing
3 Tablespoons grated sharp cheddar cheese
3 deli-thin slices roast beef
1 Tablespoon whipped cream cheese

Lay the salad mix in the center of the tortilla.  Spread the dressing on top of the salad, then sprinkle the cheese over the dressing.  Lay the roast beef slices on top of the cheese.

Spread cream cheese around the edges of the tortilla.  Roll up the filling inside the tortilla, burrito-style. The cream cheese will help seal the edges.  Cut in half and serve.


Hidden Valley Ranch Dressing also makes a great flavor base for sauces and other recipes.   You can use it in gourmet recipes like Chef Russell Jackson whipped up for an amazing blogger lunch I attended last year, or you can use it recipes so simple that even my husband can tackle.  Here's a recipe that we tried recently (from the Hidden Valley Ranch website)


Original Ranch Ravioli
Makes: 4 servings

Ingredients:
½ cup roasted red and yellow peppers, rinsed and drained and cut into thin strips
¼ cup grated Parmesan cheese
1 cup Hidden Valley® Original Ranch® Dressing
1 package (9 ounces) fresh meat or cheese ravioli

Instructions:
Cook the pasta according to the package instructions and drain.
In a large skillet, over a medium heat, combine the pasta, peppers, and dressing and stir until well blended and heated through. Serve garnished with the cheese.


We used mushroom ravioli, with a fresh porcini mushroom filling, and the dish was amazing.  You wouldn't believe how much difference that dressing makes!  It combines with the tangy sweetness of the peppers, and it really works.  I never would have thought of using Hidden Valley Ranch as a pasta sauce -- it's just one more reason why I never like to run out of it!


Win a Hidden Valley Ranch Prize Pack
One lucky Bonggamom Finds reader will win an assortment of Hidden Valley Ranch products!  The price pack includes:


* 3 bottles Hidden Valley Original Ranch Dressing
* 3 bottles Hidden Valley Light Dressing
* 6 packets of Hidden Valley Dry Seasoning Mix
* A cute blue apron so you can get cooking!


Required Entry
Leave a comment on this post and tell how you enjoy Hidden Valley Ranch Dressing

Extra Entries
For extra entries, you can do any or all of the following. Please leave a separate comment for each extra entry with a way to verify the entry (i.e. tweet link, blog post link, Facebook id, Twitter id, etc.).

1) Follow bonggamom on Blogger (1 entry)

2) Follow bonggamom on Instagram (1 entry)

3) Follow bonggamom on Pinterest (1 entry)

4) Pin this giveaway on any of your Pinterest boards (1 entry -- you can use the "Pin It" button at the bottom of this page!).

5) "Like Bonggamom Finds" on Facebook and write this on my wall (1 entry):
I entered the Hidden Valley Ranch giveaway! http://ow.ly/iSgzQ

6) Tweet this once per day (1 entry per day)
RT @bonggafinds You could win an assortment of Hidden Valley Ranch products! Enter by March 13 at http://ow.ly/iSgzQ

The Rules
This giveaway ends at 11:59PM PST on March 14, 2013; I will draw a winner at random on March 13 and post their name after they confirm acceptance. Continental US residents only. For additional giveaway rules, click here.


Disclosure: I received product samples to facilitate my review, but have not been paid to review the product or give my opinions. Prize pack was provided by Hidden Valley Ranch. The views and opinions expressed here are my own.

Pin It
Continue reading...

Search This Blog

Bongga Posts

Bongga Tweets

I'm Going!

Blog Archive


Bonggamom Finds Copyright © 2009 Cosmetic Girl Designed by Ipietoon | In Collaboration with FIFA
Girl Illustration Copyrighted to Dapino Colada